
RESTORe AND UPGRADE ALREADY EXISTING FIREPLACES with THE FIRECAST LINER, OR THE FIRECAST MASONRY SYSTEM.
WHAT TO DO FIRST
1. VIEW. The existing firebox, chamber and flue or chimney should first be viewed to establish their condition. Sweeping is recommended prior to this. If the masonry chimney is unlined and the existing smoke chamber is in poor condition, it would be advised to install the Firecast Masonry System because it includes the refractory smoke chamber. With the Masonry System, you have the advantage of fitting a current 8" single-wall pipe or flex stainless liner.
2. MEASURE. The existing firebox should then be measured. Fill out our contact form and we will mail you a template (or, if you wish, you can get a qualified installer to come and take measurements for you). Take the template and place it into the area of the firebox. The template will show that the curve of the existing firebox will allow installation of the Firecast back brick with regards to height and width. The back brick of any Firecast unit can be cut down in height. It is not recommended to cut the vertical sides to suit the width of the existing brick.
3. EXAMINE. The damper may need replacing. Rusted dampers can get stuck open or leak when it rains. We suggest a top mounted damper as they seal better, and keeps the flue warm. Our Firecast flues eliminate down draft when you first open the flue allowing warm air to rise which helps to ignite the fire. Keeps bugs and moisture out of the flue.
INSTALLATION OVERVIEW

Installation: tHE FIRECAST INSERT
1. At this stage you have the option of removing the old brick firebox. This will allow for more insulation behind the back brick. With old firebox removed, you will need a top mounted damper that is controlled by a stainless cable to a convenient area on the side of the Firecast Fireplace.
2. The refractory blanket is secured to the Firecast back brick with high temperature cement.
3. Install the back brick into the cavity and position.
4. Install the Firecast Bottom Brick into the inner area of the floor. Lay a bed of refractory mortar on the floor of the existing firebox. This will provide a solid base for the bottom brick.
5. Flares are installed into the area between Firecast Insert back brick and the facing. Ceramic rope is placed into the small gap between the Insert back brick and the flares as well as between the back brick and the bottom brick. A bead of mortar provides a grip for the rope. The rope keeps ashes out. The area is not to be totally filled with mortar as the bottom brick needs to move with the firebox temperatures.
6. Place Insulcast behind the back brick, filling cavity.
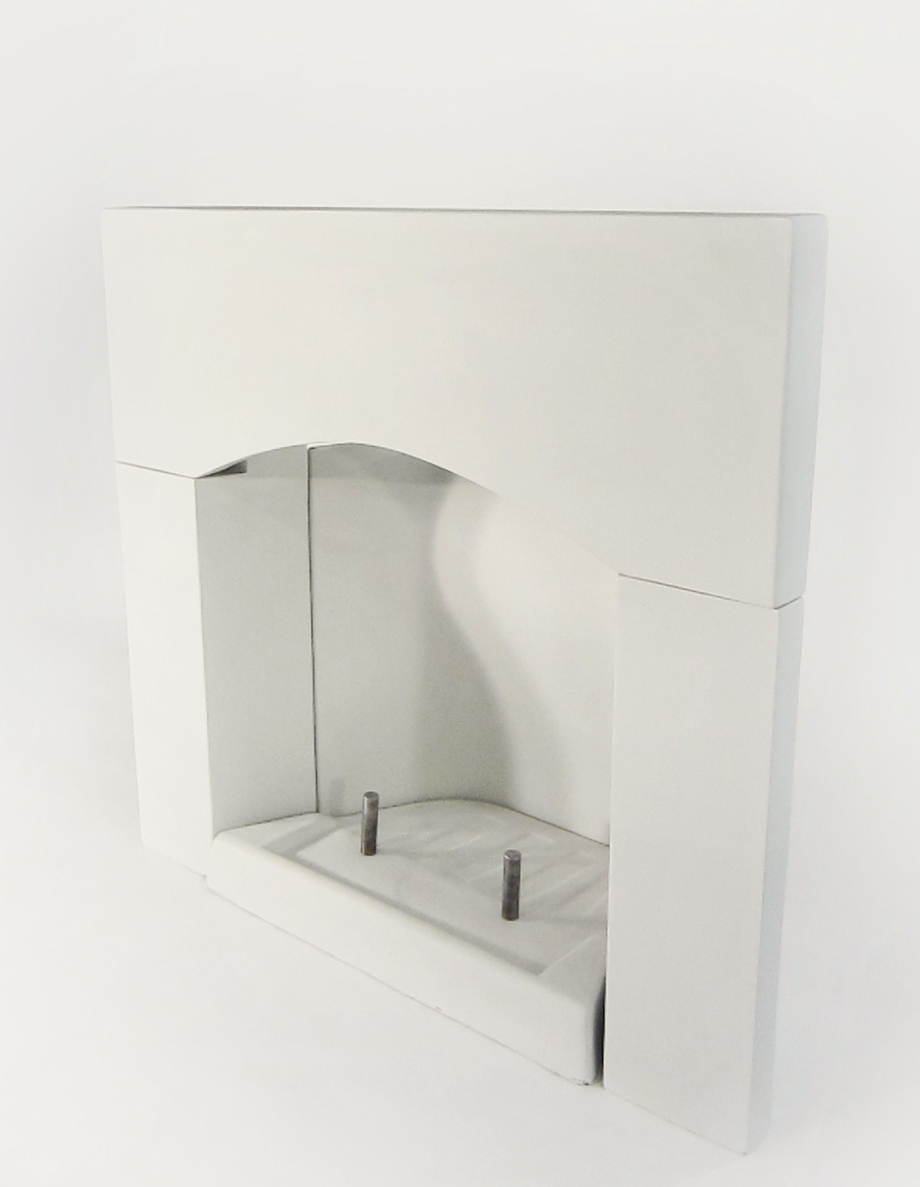
7. Install the log retainers.
8. CAUTION! The unit must be CURED SLOWLY. Due to the wet Insulcast, the first 5 fires MUST be small, slow curing, minimum fires, to avoid risk of damaging the unit.

Installation: FIRECAST MASONRY SYSTEM
1. Remove old smoke chamber - rusted metal heat form, masonry firebricks etc., to allow room for the Firecast smokechamber.
2. At this stage you have the option of removing the old brick firebox. This will allow for more insulation behind the Firecast back brick. With your old firebox removed, you will need a top mounted damper that is controlled by a stainless cable to a convenient area on the side of the Firecast. It is recommended to sweep the flue prior to your inspection for that area.
3. The refractory blanket is secured to the Firecast back brick with high temperature cement.
4. Install the back brick into the cavity and positon.
5. Install the bottom brick into the inner area of the floor. Lay a bed of refractory mortar on the floor of the existing firebox. This will provide a solid base for the bottom brick.
6. Smoke Chamber is installed onto the back brick. The pipe adapter is then installed, either casting or metal.
7. Flares are installed into the area between the facing and Firecast back brick. Ceramic rope is placed into the small gap between the Firecast back brick and the flares as well as between the back brick and the bottom brick. A bead of mortar provides a grip for the rope. The rope keeps ashes out. The area is not to be totally filled with mortar as the bottom brick needs to move with the firebox temperatures.
8. Fill in Insulcast behind and up to the top of the back brick.
9. Install the log retainers.
10. CAUTION! The unit must be CURED SLOWLY. Due to the wet Insulcast, the first 5 fires MUST be small, slow curing, minimum fires, to avoid risk of damaging the unit.
INSTALLATION: THE FIRECAST CASTFACE
1. Find centre of the Firecast hearth. Put a line two feet on either side of the centre and mark. The left and right columns are at 48" distance apart. The Castface columns butt into the back brick and ceramic blanket is cemented in to fill the gap between the back brick and the back edge of the Castface column. Plumb columns and secure into the masonry with our Firecast hardware.
2. Hight temperature mortar is placed onto the columns, and the header sits on those columns. Plumb and secure with hardware into the existing masonry.